Showing posts with label Thanksgiving. Show all posts

Thursday, November 22, 2012

Thanksgiving Turkey Blossom Box

GOBBLE GOBBLE!!! Happy Thanksgiving to ALL!!! This year's turkey may have to be put on hold but I just could not resist doing it on paper for you :) I brought out my Blossom Box Die #123127 and just thought it would be perfect for a turkey's body. Then came the head and the feathers :)
The Head was made using the following:
- Scallop Oval Punch (for the turkey's face)
- 3/4" Square Punch (for the top hat)
- Window Punch (for the hat's rim)
- 1/2" Circle Punch (for the turkey's eye balls)
- Owl Punch (use the medium circles for turkey's black iris)
- Petite Pennants Builder Punch (for the turkey's neck)
- Blossom Petals Builder Punch (smallest petal for the turkey's beak)
- Heart to Heart punch (use the big heart for the Turkey waddle, use red glitter paper to add some highlight)
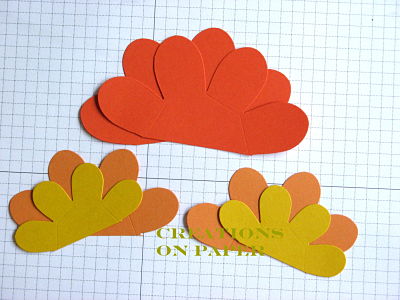
The Feathers: Use 4 colors of Cardstock and punch all four petals each)
- Blossom Petals Builder Punch (use the biggest petals for the tail feathers and Smallest, Medium, Large for the wings)
- Emboss the tail feathers to give more texture
- Use Glue Gun to adhere your feathers and turkey head on the box
Well I think that's it!!! Enjoy making your turkey box!!! It's sooo cute and attractive on your Thanksgiving Table :) I hope this was not too late to post but you can always use it next year.
I always thank the LORD for having my blog friends and followers around. You all keep me inspired to create and go on.
"Of all the things which wisdom provides to make life entirely happy, much the greatest is the possession of friendship." - Epicurus
Please let me know if you have any questions or suggestions. Please visit my blog and my Stampin Up Website! Have a nice day! >

Wednesday, November 24, 2010

Thanksgiving Turkey Tutorial- Favor


It's the day before Thanksgiving and time is closing in on me. So many things to do, so little time. As I do this quick tutorial, I will have to get back with you on the details. So I'm just posting the pictures for you to follow. I hope you find it instructive.
BTW, I posted some pictures from our Church Thanksgiving Dinner at Corpus Christi last Monday night. It was so much fun putting the table together and seeing how it turned out. Not to mention, the FOOD WAS GREAT!!! Thanks, Mom for helping set up the table :) HAPPY THANKSGIVING TO ALL!!!!!!
Here's the Tutorial:


Please let me know if you have any questions or suggestions. Please visit my blog and my Stampin Up Website! Have a nice day!

Wednesday, November 17, 2010

Turkey Punch Art Class and More


Hi! Do you want to learn more of my Thanksgiving Punch Art? I'm having a class!!! Come and learn all my Thanksgiving turkey punch art, specially what I just created this season. You already had a glimpse of my Turkey Owl last week. Here's a turkey punch art I made which you can put on each plate on your Thanksgiving dinner table. Isn't he so cute.


I also made a Turkey Punch Art with a dessert. Wouldn't you want this on your Thanksgiving table? Guess what's in it! Learn more in my class so hurry and sign up now before it gets full! You can use my tools and make as many as you want for your dinner table!!! Just bring your paper! Come see at first hand, my upcoming Xmas punch art and Xmas boxes in person!!
Where: At my home
When: Friday Night, November 19th
Contact me for more details.

Please let me know if you have any questions or suggestions. Please visit my blog and my Stampin Up Website! Have a nice day!

Saturday, November 13, 2010

Turkey Owl Punch Art


Every year, my Thanksgiving is not complete without a turkey punch art. Thanks to the Owl punch #118074, it's easier to create him this year :) Isn't he so cute. Well, I'm going to show you how he's made.

First, you will need all this punch:
- Owl Punch #118074(for the turkey's body and the black of the eyes)with ears cut off
- Large Oval Punch #119855(the turkey's butt)
- 1/2" circle punch #119869(the eyes) \
- 3/4" square punch (the top hat)
- window word punch #119857(the rim of the hat)
- Itty Bitty Shape Punch Pack #118309- the 4 petal punch (under the beak)
- Butterfly Punch #119848- for the feathers
and
- cut 1/4" square for the beak

Cardstocks used:
- Feathers - Real Red, Daffodil Delight, Old Olive, Pumpkin Pie
- Body - Crumb Cake
- Hat - Basic Black
- Turkey Waddle - Cherry Cobbler
- Turkey Butt - Chocolate Chip Brown


Instructions:

Step 1: Adhere owl to the large oval as illustrated


Step 2: Adhere the eyes and the waddle.


Step 3: Cut the Window Word punch piece lengthwise in half. Then cut a 1/3 off. Use the 2/3 piece as the rim of the hat.


Step 4: Adhere the hat then cut the Butterfly punch piece in half as feathers.


Note the position of each feather. The Real Read and the Daffodil Delight are upside down and the Old Olive and Pumpkin Pie CS are rightside up. Then follow the illustration below on where to place the specific point position of each turkey feather pieces.


Then you have your Thanksgiving Turkey!!!! Don't forget his beak and highlights on the eyes with a white gel pen. Have fun!!!


Please let me know if you have any questions or suggestions. Please visit my blog and my Stampin Up Website! Have a nice day!

Tuesday, December 1, 2009

Give Thanks Card


It's been a month since I moved and I planned to get this out earlier, but didn't get the chance :( Anyway, I sent some out later. If you didn't get one, here is my post to say "I'm Greatful for You". :) Plus, this card served as my notification that I've moved..hehehe. I added more this card but didn't get the chance to show them to you. You may add on some leaves around the card in different colors. That'll give more perk to the card. I hope you like it :)

Surprise! There's a pop up turkey inside the card!!! What's thanksgiving without a turkey?
To pop out the turkey, I punched a window word piece of cardstock and folded it 3 way the stuck the turkey onto one side of the piece. Now your ready to attach the pop up to your card with both ends of the window word piece! It's easy!

For instructions on the Turkey Punch Art, click HERE:


Supplies Needed:
- Cardstock: Crushed Curry #115319 p.155 (IBC)
- Ink: Chocolate Chip Brown #102128 p.156 (IBC)
- Stamp Set: Welcome Home #113433 p.66 ; Holiday Best #115364 p.13 (Hostess Level 1 Set)(IBC)
- Felt Ribbon
- Scallop Oval Punch #114889 p.186 (IBC)
- Big Shot Machine #113439 p.194 (IBC)
- Textured Impression Folder (SU! Elegant Bouquet)#115964 p.195 (IBC)


Please let me know if you have any questions or suggestions. Please visit my blog and my Stampin Up Website! Have a nice day!

Wednesday, November 25, 2009

Thanksgiving Turkey - Punch Art


GOBBLE, GOBBLE, GOBBLE!!! IT"S HERE, IT'S HERE!!! My Turkey Punch art came a little late this year but you'll still have time to make these cute and easy punch art! You may decorate him around your house or at the dinner table tomorrow! I promise, It's QUICK!!! DEFINITELY LOTS OF FUN!!!

I made 2 turkeys for your choice. My mom loves the one on the left and my dad likes the one on the right...hehehe. Preferences!! You pick!!! Anyway, it's just a difference of what punch to use for the feathers. I had a comment from the Luv2Stamp Group where they've said that one looks like a turkey girl and the other a turkey boy. How cute is that!


Glue them all together as illustrated.
Cut 3 of the Window Word or the Modern Label pieces in half for the feathers.
Cut 1 red Window word in 1/4 pieces and use only the tips for his giblets on his head and chin.
Cut the Boho Blossom piece in half for his feet.
Cut a square for his beak.


Supplies Needed:
PUNCH: pgs.186-187 (IBC)
- 1" Circle Punch #109046
- 1-3/8" Circle Punch #104401
- 1/2" Circle Punch #104390
- Hand held 1/8" Circle Punch
- Scallop circle Punch #109043
- Boho Blossoms Punch #110711
- Window Word Punch #105090
- or Modern Label Punch #116630

PAPER: pgs 155-156 (IBC)
- Real Red #102482
- Crushed Curry #115319 (In Color)
or Summer Sun #103124
- Pumpkin Pie #105117
- Chocolate Chip Brown #102128
- Whisper White #100730
- Basic Black #102851
- Creamy Caramel #102514

OTHER:
- GLUE: I prefer to use Crystal effects glue #101055(you can control small amounts of glue)

Please let me know if you have any questions or suggestions. Please visit my blog and my Stampin Up Website! Have a HAPPY GOBBLE GOBBLE DAY!!!!

Monday, November 24, 2008

Thanksgiving Favors


Hi! It's me again! Here is part 2 of the Thanksgiving Table accessories. To give the guest a little something to take home, I made these cute favors. Yes, the pillow boxes. You may find them in any office supply store. They're called "Clear Binding Cover" for presentation books or meeting materials. They come in 25 sheets (very reasonably priced), they're safer too. One sheet will make 4 pillow boxes. The best thing about the plastic is that it's easy to handle and holds its folds. It's not flimsy. I just adhered it with sticky tape to hold it strong.
DSP: Hawaii Papaya (I had a lot of scraps and it still expresses the autumn colors)
You'll be needing these tools:

Other Notes: The ribbons used may be found in craft stores. Buy a whole bulk of chocolate covered raisins in Cosco, it's cheaper and chocolates are shinier. They won't stick onto the plastic. I'm not too happy about chocolates sticking. Check out napkin ring instructions.
Here is my Blog.

Thanksgiving Dinner Accessories - Napkin Ring


We just had Thanksgiving dinner in our church and I had to come up with a quick and easy napkin ring. It was so simple it just got compliments on our table.
Cardstock: Kiwi Kiss
You may need the following tools to make this:


Other Notes: The ribbon I used may be found in a craft store. It's wine red. It really just brought out the kiwi kiss. If you can use real napkins, it'll be fabulous specially on white plates!

LinkWithin

Blog Widget by LinkWithin