Wednesday, November 26, 2008

Jingle all the Way - RUB ONS - Part 1


Hi! I know that's it's just thanksgiving but I can't help getting ahead to the Christmas Spirit. I made this frame as a gift to a friend of mine who hosted a stamp camp party. It just fits her whole ensemble on the corner of her lovely living room. She even put a stand on it. Here is closer look at the bottom where I filled the frame with small and medium bells. Frame size is 10" x 12".

Like Patty's frame I used the medium Park Avenue Balls and the medium "Jingle Bells" Rub-On. I also used the Riding Hood Red/Very Vanilla Ribbon.
DSP: Chocolate Chip DSP and the Bella Rose DSP
Other Note: I had to use a gold backing punched with the Large Scallop Die to emphasize the "Jingle Bells all the Way" title. I also used 10" x 20" frame and a vine of bells which may be purchase in a craft store.
Please let me know if you have any questions or order in my Stampin UP website.
RUB-ONS are now on sale for 20% off with purchases of $20 or more. So hurry and get yours before November 30th!
For more free Project ideas, visit my BLOG.

Monday, November 24, 2008

Thanksgiving Favors


Hi! It's me again! Here is part 2 of the Thanksgiving Table accessories. To give the guest a little something to take home, I made these cute favors. Yes, the pillow boxes. You may find them in any office supply store. They're called "Clear Binding Cover" for presentation books or meeting materials. They come in 25 sheets (very reasonably priced), they're safer too. One sheet will make 4 pillow boxes. The best thing about the plastic is that it's easy to handle and holds its folds. It's not flimsy. I just adhered it with sticky tape to hold it strong.
DSP: Hawaii Papaya (I had a lot of scraps and it still expresses the autumn colors)
You'll be needing these tools:

Other Notes: The ribbons used may be found in craft stores. Buy a whole bulk of chocolate covered raisins in Cosco, it's cheaper and chocolates are shinier. They won't stick onto the plastic. I'm not too happy about chocolates sticking. Check out napkin ring instructions.
Here is my Blog.

Thanksgiving Dinner Accessories - Napkin Ring


We just had Thanksgiving dinner in our church and I had to come up with a quick and easy napkin ring. It was so simple it just got compliments on our table.
Cardstock: Kiwi Kiss
You may need the following tools to make this:


Other Notes: The ribbon I used may be found in a craft store. It's wine red. It really just brought out the kiwi kiss. If you can use real napkins, it'll be fabulous specially on white plates!

Sunday, November 23, 2008

Holiday Box Galore


Hello again! We just had a fabulous time making boxes this weekend in Stamp Class and couldn't resist making many tags and band closures for them. Here are other possible ideas.

Cardstock and DSP:
Real Red, Riding Hood Red, Chocolate Chip, Kraft, Gable Green, Pretty in Pink, Brillant Blue with Yoyo Yellow (for a little boy's bday party). Don't forget the Chocolate Chip DSP for the band closures
Stamps:
Deer Friends Set, Best Yet Set


My friend and host, Mayda, prepared homebaked goodies for us and we can't wait to fill the boxes with her delicious treats.Pecan Truffles, Chocolate Fudge Truffles, and Brownies. BTW, she sells them too. We're now ready for our Holiday Giveaways!
OTHER NOTES: Click here for Box Instructions.

You may start ordering supplies at my Stampin UP Website just in time for the holidays!

TO ORDER HOLIDAY BOXES - includes Cardstock (real red/chocolate chip, DSP Bind Closure and Tag (boxes are delivered scored and cut, but not assembled). Don't forget to indicate what type of tag you want from the "Deer Friends" or "Best Yet" Stamp set.

Price:
$1.00 each, plus shipping and handling.


Saturday, November 22, 2008

Holiday Winter Post Card- Part 2


Hi! Here are more card versions of how to use your Winter Post Stamp set. It's a 4-14" x 5-1/2" card which is pretty easy to make. I mixed and matched some of the parts of the cards so feel free to play around with it too. I love the paper and stamps because they truely coordinate with each one. (notice the 2 deers I stamped, they look like a nice couple)

Tools you may need and instructions to make the ponsettias are from the Part 1 post.
Additional Tools: Wide Oval Punch; Large Oval Punch; Riding Hood Red and vanilla striped ribbon; Top Notes Die Cut - BigShot
Additional Note: The ribbon used on the first card may be bought in a craft store. Enjoy!

Holiday Tag Collection - Santa

Hello, Ladies! I finally got my video uploaded. Thank goodness! Anyway, this video will be my very first video tutorial, so be kind..hee. I hope you like it.
Cardstock: Real Read, Pink Pirouette, Whisper white
Tools: Scallop Circle Punch, 1/2" circle punch

Additional Notes: The moustache is a 1/2" whisper white circle cut in half and the nose is a pink pirouette 1/2" circle. Pens used are gel pens.
Please email me if you have any questions. Have fun making it!

Friday, November 21, 2008

Christmas Winter Post Card - Part 1


Hi Ladies! Today, I'll be showing you a card I'll be making in my Stamp Class this Saturday. It's a Holiday Winter Post Card. Obviously, I'll be using the Winter Post set more frequently. It's fun and easy to make with. Enjoy!

Cardstocks: Real Red, Old Olive, Whisper white, Yoyo Yellow

You'll be needing these tools:


To make a Ponsettia, Punch out 2 Real Red Cardstock, 1 Old Olive Cardstock with the 5 petal punch, 3 pcs of 1/4 yoyo yellow circle punch. Fold each petal in the middle, lenght wise. And adhere all parts as indicated below. Don't forget to adhere the Old Olive 5 petal behind your ponsettia You may glitter it up in the center with Dazzling Diamond Glitter.


Additional Note: I used "Certainly Celery" pen on the middle of each yoyo yellow punch. Used Crystal Glue effects to apply glitter. Ribbon used here is from a craft store. However, you may use any chocolate chip or riding rood red ribbon from SU.

Please let me know if you have any questions or want to order in my SU Website.

Thursday, November 20, 2008

Holiday Tag Collection - Penguin Peek a Boo


Hello! As promised, here is my second tag on my Holiday Tags Series. The original penguin was Heather's idea. I made some modifications to it and I hope you like it. Assemble time: 3 minutes You will need the following tools:


Cardstock Use:
Brilliant Blue, Green Galore, Yoyo Yellow, Real Red, Whisper White, Kraft and Basic Black


Just follow the STEP illustrations and you'll soon have your little penguin tag!


Assemble as shown below:


Well, I hope you liked it! Please let me know if you have questions. Email me at shaintl@yahoo.com or to order items from my SU Website.

Wednesday, November 19, 2008

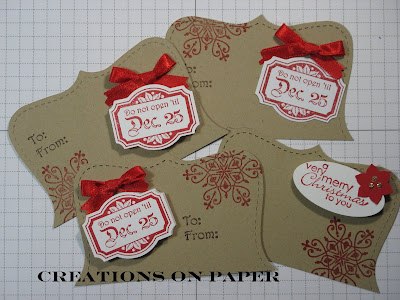
Holiday Tag Collections - Dec25


Hello Everyone! I will be showing a series of tags this next few days. Today, I will show you a fast and simple one to make. It'll only take you a minute to do one. All you have to do is just copy the displayed photo above. It's pretty easy! Before you start, bring together the following tools and materials:


Or, you can make another design ( with the oval punch and ponsettia ) with these other tools:


Anyway, if you have any questions or want to order some items. Just visit my Stampin Up website or email me at shaintl@yahoo.com .

Other NOTES: The 3/8 wide- red satin ribbon may be purchased in any craft store. Used Stampin Dimensionals to raise the inner title tag.

Friday, November 14, 2008

Holiday Treat Box


Today's tutorial will show you how to make this Holiday Treat Box. This box was requested from me by a friend who wanted a cute package for her pecan truffles. Just put your treat into a cellophane bag and into this box. Have fun making it!
Box Dimensions:
5” w x 3” h x 2-½” d
Cardstock:
*chocolate chip
*real red
*whisper white
Base Measurement
* 8-1/2" x 11" cardstock
* scored at 3" on each side
Fold all scored sides and cut slits on the scored edge to the corner score.
Assemble and adhere with sticky strip


Cover Measurement
* 4-5/8" x 7-1/16"
* scored at 1" on each side
Fold all scored sides and cut slits on the scored edge to the corner score
Assemble and adhere with sticky strip


Scallop edge for Cover
* 2 strips of whisper white cardstock, cut 1-1/2" x 7-5/8”
* scored at 5-1/8” each
Punch the 2 strips on one long side each with scallop edge punch


Tag
* Used Scallop punch with whisper white cardstock
* Used Snowflake from “Winter Post” set with “Certainly Celery” Ink Pad
* Stamped “to You from Me” from “Best Yet” set with “Real Red” Ink Pad
* Tie a ribbon and adhere your tag
You may also decorate this box with any DSP. You'll love it with any color. Enjoy!!!

Monday, November 10, 2008

2008 Holiday Faire was a Success


We did it! Our first Holiday Craft Faire! It was fun setting up for the event as well as meeting customers. The cards and bears came out so beautiful and attractive, we hit good sales specially on Saturday. We got custom orders as well as leads for those who were interested in hosting classes. We also made scalloped turkeys which SOLD OUT! Some kids bought them for class projects and some as thanksgiving decor on the dinner tables. Oh my, this was really a great experience. We can't wait for the next one which will be on December 6th in Mission Viejo.

Special thanks to Christine who helped us with the cashiering. She was so alert and showed great initiative. The beautiful cards you see are made by Raidis and she really got so many compliments and orders for them too. Check out her blog too. http://www.seekandkeep.blogspot.com/ .

LinkWithin

Blog Widget by LinkWithin